git tag

  • Git 에서 Tag는 commit을 참조하기 쉽도록 알기 쉬운 이름을 붙이는 것을 의미
  • 보통 tag는 소프트웨어의 버전을 릴리즈 할 때 사용

tag의 종류

Lightweight 태그

  • 브랜치와 비슷한데 브랜치처럼 가리키는 지점을 최신 커밋으로 이동시키지 않음.
  • 단순히 특정 커밋에 대한 포인터
  • git tag 태그 명령어로 태깅
  • git show 태그 명령으로 생성된 태그가 붙은 커밋 확인

Annotated 태그

  • Git 데이터베이스에 태그를 만든 사람의 이름, 이메일과 태그를 만든 날짜, 그리고 태그 메시지도 저장.
  • 일반적으로 Annotated 태그를 만들어 이 모든 정보를 사용할 수 있도록 함
  • git tag -a 태그 -m "코멘트" 명령어로 태깅

삭제

  • git tag -d "tag명"

'개발환경' 카테고리의 다른 글

Git branch  (0) 2024.06.08
설치형 eXERD v3 SVN 플러그인 설치  (0) 2024.03.27
서버단에 프로그램 올리기  (0) 2022.11.17

branch

  • git에서 브랜치는 개발의 독립적인 라인
  • 소프트웨어 개발시 개발자들은 동일한 소스코드를 함께 공유하고 다룸 -> 각각 서로 다은 버전의 코드가 만들어짐
  • 여러 개발자들이 동시에 다양한 작업을 할 수 있게 해주는 기능이 브랜치(Branch)
  • 각각의 독립적인 작업 영역(저장소) 안에서 마음대로 소스코드를 변경할 수 있음

branch의 이해

  • git으로 버전관리 시작시 기본적으로 브랜치가 생성된 상태로 작업 수행 (메인 브랜치)
  • 마스터 브랜치가 존재하는 상황에서 수정 또는 새로운 개발이 필요하다면 이를 바로 마스터 브랜치에서 수정하는 것이 아니라 새로운 브랜치를 생성하여 수정
  • merge 기능을 통해 브랜치간 차이점을 비교하고 통합을 하게 된다.

git flow

  • Git Flow는 Git으로 형상관리를 할 때 브랜치를 효율적으로 관리하기 위해 사용하는 브랜치 관리 전략이다.
  • git flow에서 사용하는 branch의 종류
    • master : 제품으로 출시될 수 있는 브랜치
    • develop : 다음 출시 버전을 개발하는 브랜치
    • feature : 기능을 개발하는 브랜치
    • release : 이번 출시 버전을 준비하는 브랜치
    • hotfix : 출시 버전에서 발생한 버그를 수정 하는 브랜치

branch 생성

  • git branch : 현재 branch 확인
  • git branch 신규브랜치명 : 신규 branch 생성
  • git log : 만들어진 브랜치 확인, 현재 작업 중인 Head 브랜치 확인
  • git checkout 이동할브랜치명 : 브랜치 이동

branch 병합

두 개의 브랜치가 서로 다른 파일을 작업 한 경우 병합

  • Merge 명령어로 작업 (충돌없음)
  • 병합의 주체가 마스터 브랜치이기 때문에 현재 HEAD가 마스터 브랜치를 가리키고 있는지 확인

서로 같은 파일 내 다른 위치를 수정했을 때 병합

  • Merge 명령어로 작업 (충돌없음)

서로 같은 파일 내 같은 위치를 수정했을 때 병합

  • Conflict(충돌) 발생 -> Merge 작업 중단, 해당 내용을 직접 수정한 후 다시 merge 실행
  • 개발 수행시에 업무 영역을 최대한 잘 정의하여 브랜치 merge해야함

branch 병합 원리

fast-forward merge

  • 신규 브랜치를 생성한 후 master branch에 변화가 없는 경우
  • fast-forward 관계에 있는 브랜치에서 git merge 명령을 입력하면 새로운 commit이 생기지 않음
  • 이전 브랜치의 참조 객체가 앞서있는 브랜치가 가리키는 개체를 참조하도록 이동

3-way merge

  • 공통 부모를 가리키는 커밋을 중심으로 merge 커밋이 생성되는 방식을 3-way merge라고 한다.
  • Master에도 변경 사항이 생기고, 특정 Branch에도 변경사항이 생겼을 때 병합하면 Merge Commit이 생기면서 양쪽 변경점을 모두 포함한 상태로 Merge가 된다.

rebase

  • 공통 base(조상)를 가진 두 branch에서 하나의 branch 의 base를 다른 branch 의 최신 Commit을
    base로 하게끔 재정렬 하는 것을 의미
  • 병합의 명령어라기 보다는 브랜치의 commit을 정리하는 명령어
  • merge 에 비해 commit log 를 깔끔하게 관리 할 수 있음
  • Merge는 branch를 통합하는 것이고, Rebase는 branch의 base를 옮 긴다는 개념의 차이

branch 관리

branch 삭제

  • 병합된 branch 삭제할 때는 git branch –d branch-name 명령을 통해 삭제가 가능하다.
  • 병합되지 않은 branch를 삭제할 때는 git branch –D branch-name 으로 삭제가 가능하다.

'개발환경' 카테고리의 다른 글

Git Tag  (0) 2024.06.08
설치형 eXERD v3 SVN 플러그인 설치  (0) 2024.03.27
서버단에 프로그램 올리기  (0) 2022.11.17
  1. 기업에서의 LLM 활용과 평가 , 펜타시스템테크놀러지(주)
  2. AICC(인공지능 컨택센터)의 미래, 페르소나에이아이
  3. End to End AI 개발 환경 구축, 휴렛팩커드 엔터프라이즈-엠키스코어
  4. AI/ML 비지니스를 위한 데이터플랫폼 기술의 중요성 및 이를 이용한 생성형 AI, 디지털 트윈의 활용방안, 아이크래프트
  5. AI Operating System - LLM 파인튜닝, 배포부터 지속해서 확습하는 멀티 에이전트 시스템까지, 베슬에이아이

AI 개발환경 구축시 중요한 점

  • 데이터 분석과 예측을 합쳐서 생각할 것
  • 국내 환경의 경우 데이터 규제로 인하여 퍼블릭 100%는 어려움
  • 하이브리드 온프레미스 환경을 가정하고 진행

데이터 플랫폼

  • 자유로운 데이터 활용이 가능하고 데이터 주체성이 있는 상태가 중요
  • 기술은 그 이후의 문제
  • 해외의 성공적인 AI 적용 서비스 (넷플릭스, 메타 등)은 수많은 모델과 뎁스를 적용해보고 효과있는 모델만 공개함 → 데이터가 중요하고 모델은 계속 교체
  • 프로덕션 환경에서는 파일럿 환경에서 등장하지 않는 케이스 발생 → 소수의 케이스가 소송건으로 발전한다면 투입될 비용 예측 불가
  • 획일적인 파이프라인이 아닌 파이프라인 가지가 필요 (데이터 수집)
  • AI 프로젝트는 성공 실패가 아닌 세모가 존재
  • AI 적용전 AS-IS 분석이 필수, 기존 데이터 플랫폼이 어떻게 구축되어 있는지
  • 안정화 되어도 품질유지를 위한 비용은 계속 발생 → 역수익화 발생
  • 역수익화 상황을 막기 위해서는 데이터와 플랫폼이 잘 구축되는 것이 우선
  • 데이터 마켓 및 테이터의 버전 관리

LLM 도입 전 고려사항

  • 비지니스 목표 설정
  • LLM 모델의 현지화
  • 적정한 모델 평가로 기업에 맞는 LLM 선정
  • 다양한 LLM 모델을 평가하고 비교하여 요구사항에 적합한 모델을 선택해야함
    • Horangi 한국어 LLM 리더보드 등 다양한 언어 모델 평가 툴 존재
  • Hallucination 방지

Open Source VS Private Models

  • 오픈 소스 모델들의 성능이 나날이 발전하여 유료 모델과 큰 차이가 나지 않음

AI 기술의 발전 및 경쟁 과열로 인한 기업의 고민

  • AI/ML 기술이 발전할수록 기업의 단위 서비스 개발 및 출시는 용이해지고 있음
  • AI의 지속적인 서비스 품질 유지를 위한 시스템 유지관리 비용
  • 하루하루 갑자기 등장하는 AI 신기술과 경쟁사의 새로운 비지니스 상품
  • 시장의 법/제도 및 조직 내부 정책 변화에 따른 시스템 변경 필요성 식별 및 시스템 구조 변화 문제
  • 특정 솔루션, 플랫폼, 기술 종속 상황에 따른 역 수익구조 발생 및 종속 탈출 불가 현상
  • 기업이 구축에 돈만 지출하고 막상 자신들의 빅데이터와 머신러닝 시스템을 통제하지 못하는 경우 발생

새롭게 시도하는 ML/AI 서비스가 제대로 성공하지 못하는 이유?

  • ML, AI 프로젝트의 특징 : 100% 성공 보장을 할 수 없음. 그리고 이를 인정하지 쉽지 않음
  • ML, AI로만 할 수 있는 분야인지, 아니면 대체 기술로 가능한 영역인지 구분 필요.
  • 기술적으로 구현해 내는 결과를 내부적으로 만족하는 것과 막상 실제 사용자가 만족하는 것은 다름
  • 서비스 출시 후 보정/보완 단계에서 더 많은 노력(비용, 인력, 시스템)이 필요함을 미리 인지해야함

데이터 플랫폼 관리 체계는 항시 고려하자

  • Data Governance를 단순히 특정 솔루션 도입만으로 해결될 것이라고 생각하면 큰 오산
  • 그렇다고 Data Governance를 정리하지 않고 시작하여 프로젝트 및 시스템 실패를 걱정하면 안됨
  • 상황에 맞는 주요 요소들을 정립하여 파이프라인 설계 및 표준화에 반영하고 점진적으로 시스템화 가능한 것들은 시스템화, 정책으로 처리 가능한 것들은 정책으로 발전시켜야함
  • 진정으로 중요한 것들은 제품만으로 해결 불가능
  • 무종속을 우선하되 활용가능한 서비스는 최대한 적용해 본다

'GPT' 카테고리의 다른 글

🦜️🔗 Model I/O  (0) 2024.05.01
ChatOpenAI  (0) 2024.04.30
🦜 랭체인(LangChain)  (0) 2024.04.29
GPT 프로젝트를 위한 Python 환경설정  (0) 2024.04.29

Model I/O

  • 랭체인의 다양한 모듈 중 하나

1. Few-shot prompt templates

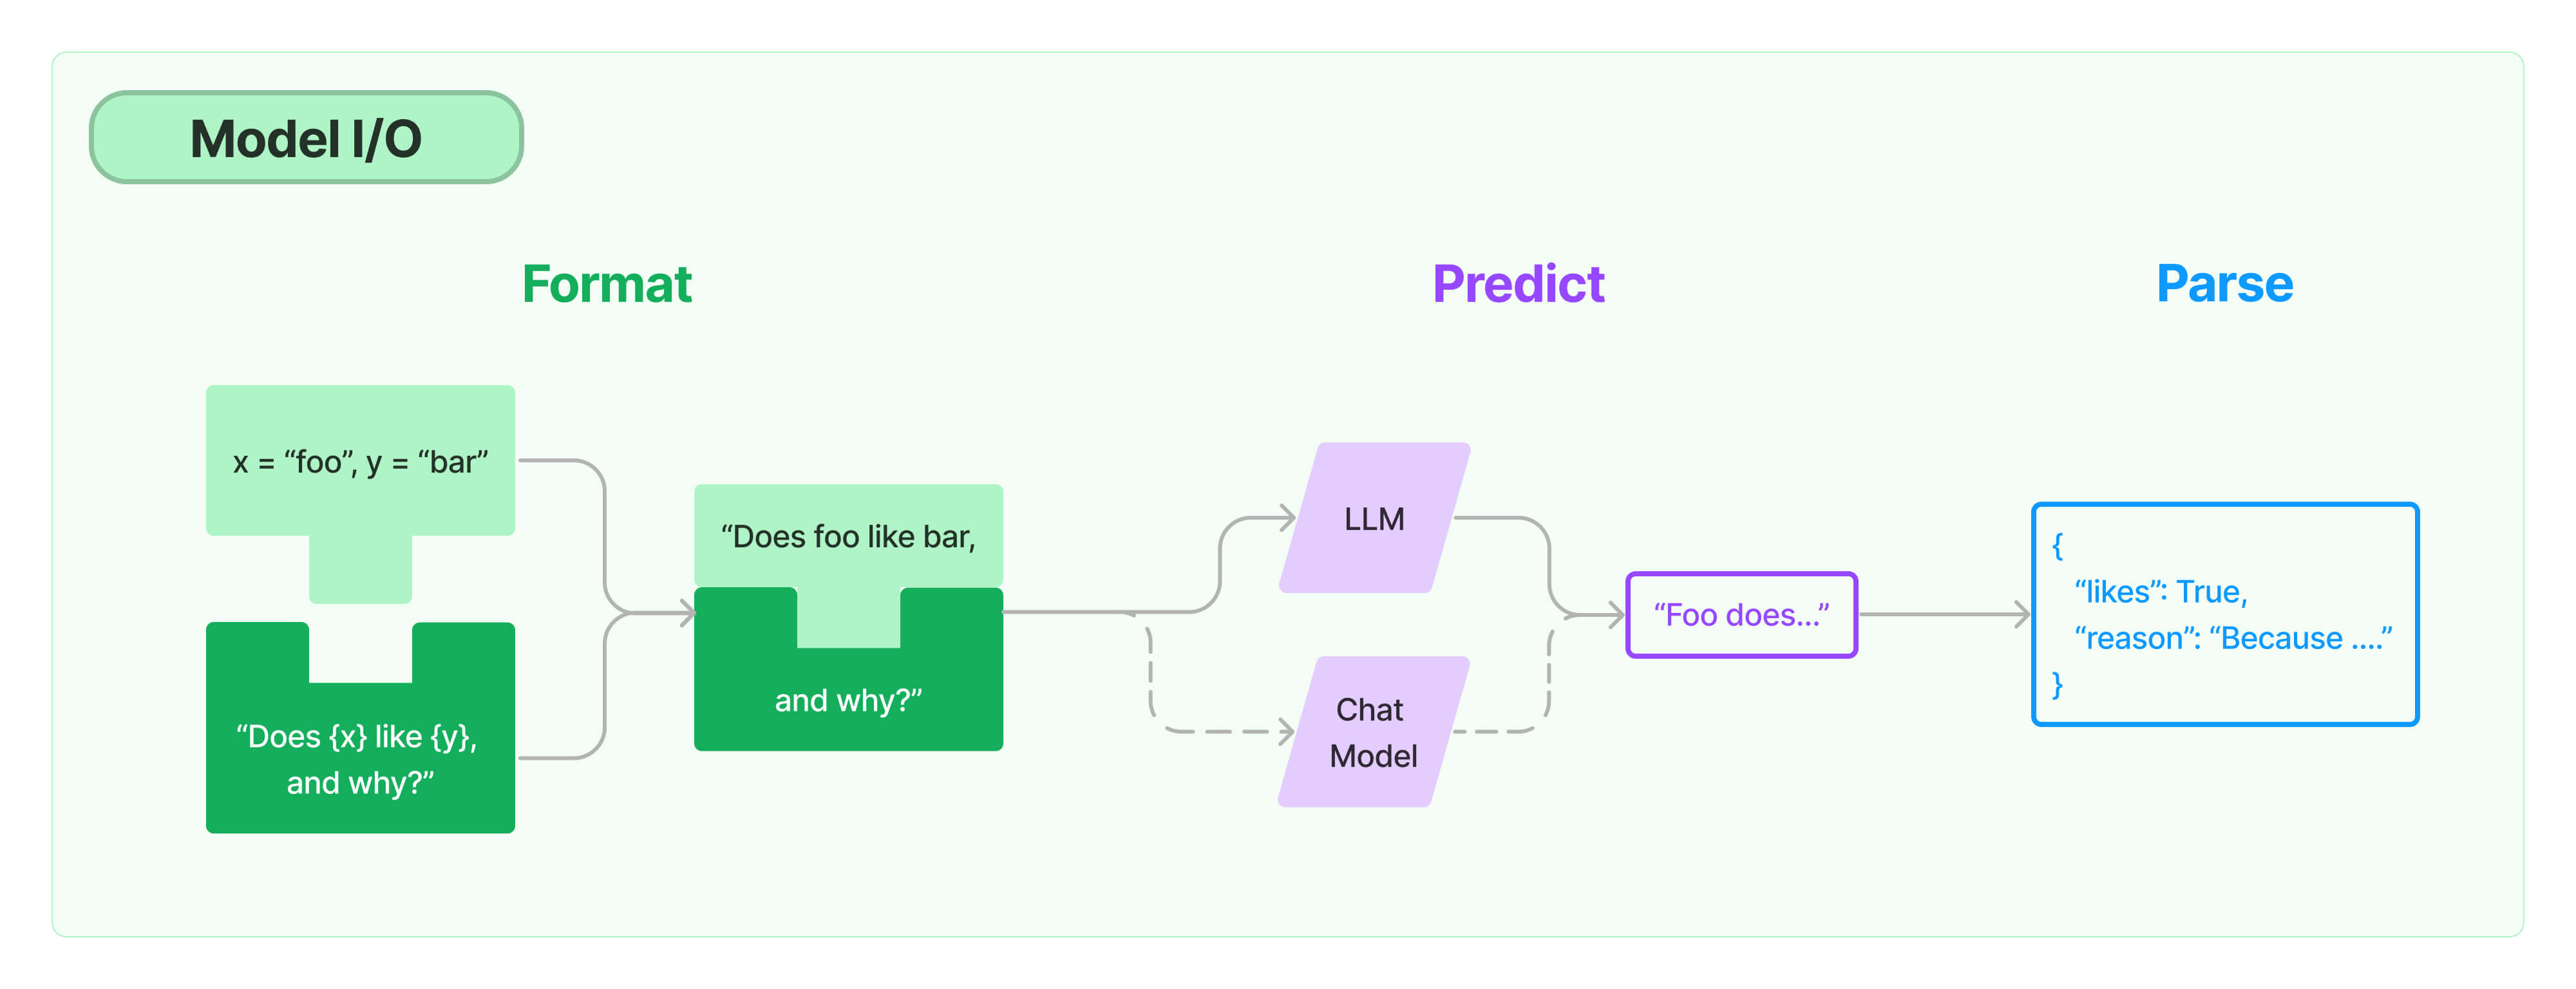
  • fewShot : 모델에게 예제를 제공
  • 단 예제를 무한히 줄 수는 없음 : 비용문제, 제한존재
from langchain_core.prompts.few_shot import FewShotPromptTemplate
from langchain_core.prompts.prompt import PromptTemplate

examples = [
    {
        "question": "Who lived longer, Muhammad Ali or Alan Turing?",
        "answer": """
Are follow up questions needed here: Yes.
Follow up: How old was Muhammad Ali when he died?
Intermediate answer: Muhammad Ali was 74 years old when he died.
Follow up: How old was Alan Turing when he died?
Intermediate answer: Alan Turing was 41 years old when he died.
So the final answer is: Muhammad Ali
""",
    },
    {
        "question": "When was the founder of craigslist born?",
        "answer": """
Are follow up questions needed here: Yes.
Follow up: Who was the founder of craigslist?
Intermediate answer: Craigslist was founded by Craig Newmark.
Follow up: When was Craig Newmark born?
Intermediate answer: Craig Newmark was born on December 6, 1952.
So the final answer is: December 6, 1952
""",
    },
    {
        "question": "Who was the maternal grandfather of George Washington?",
        "answer": """
Are follow up questions needed here: Yes.
Follow up: Who was the mother of George Washington?
Intermediate answer: The mother of George Washington was Mary Ball Washington.
Follow up: Who was the father of Mary Ball Washington?
Intermediate answer: The father of Mary Ball Washington was Joseph Ball.
So the final answer is: Joseph Ball
""",
    },
    {
        "question": "Are both the directors of Jaws and Casino Royale from the same country?",
        "answer": """
Are follow up questions needed here: Yes.
Follow up: Who is the director of Jaws?
Intermediate Answer: The director of Jaws is Steven Spielberg.
Follow up: Where is Steven Spielberg from?
Intermediate Answer: The United States.
Follow up: Who is the director of Casino Royale?
Intermediate Answer: The director of Casino Royale is Martin Campbell.
Follow up: Where is Martin Campbell from?
Intermediate Answer: New Zealand.
So the final answer is: No
""",
    },
]

example_prompt = PromptTemplate(
    input_variables=["question", "answer"], template="Question: {question}\n{answer}"
)

print(example_prompt.format(**examples[0]))

2. Few-shot examples for chat models

from langchain_core.prompts import (
    ChatPromptTemplate,
    FewShotChatMessagePromptTemplate,
)

examples = [
    {"input": "2+2", "output": "4"},
    {"input": "2+3", "output": "5"},
]
# This is a prompt template used to format each individual example.
example_prompt = ChatPromptTemplate.from_messages(
    [
        ("human", "{input}"),
        ("ai", "{output}"),
    ]
)
few_shot_prompt = FewShotChatMessagePromptTemplate(
    example_prompt=example_prompt,
    examples=examples,
)

print(few_shot_prompt.format())

final_prompt = ChatPromptTemplate.from_messages(
    [
        ("system", "You are a wondrous wizard of math."),
        few_shot_prompt,
        ("human", "{input}"),
    ]
)
from langchain_community.chat_models import ChatAnthropic

chain = final_prompt | ChatAnthropic(temperature=0.0)

chain.invoke({"input": "What's the square of a triangle?"})

3. Select by length

3.1 LengthBasedExampleSelector

from langchain_core.example_selectors import LengthBasedExampleSelector
from langchain_core.prompts import FewShotPromptTemplate, PromptTemplate

# Examples of a pretend task of creating antonyms.
examples = [
    {"input": "happy", "output": "sad"},
    {"input": "tall", "output": "short"},
    {"input": "energetic", "output": "lethargic"},
    {"input": "sunny", "output": "gloomy"},
    {"input": "windy", "output": "calm"},
]

example_prompt = PromptTemplate(
    input_variables=["input", "output"],
    template="Input: {input}\nOutput: {output}",
)
example_selector = LengthBasedExampleSelector(
    # The examples it has available to choose from.
    examples=examples,
    # The PromptTemplate being used to format the examples.
    example_prompt=example_prompt,
    # The maximum length that the formatted examples should be.
    # Length is measured by the get_text_length function below.
    max_length=25,
    # The function used to get the length of a string, which is used
    # to determine which examples to include. It is commented out because
    # it is provided as a default value if none is specified.
    # get_text_length: Callable[[str], int] = lambda x: len(re.split("\n| ", x))
)
dynamic_prompt = FewShotPromptTemplate(
    # We provide an ExampleSelector instead of examples.
    example_selector=example_selector,
    example_prompt=example_prompt,
    prefix="Give the antonym of every input",
    suffix="Input: {adjective}\nOutput:",
    input_variables=["adjective"],
)
# An example with small input, so it selects all examples.  
print(dynamic_prompt.format(adjective="big"))

# An example with long input, so it selects only one example.  
long_string = "big and huge and massive and large and gigantic and tall and much much much much much bigger than everything else"  
print(dynamic_prompt.format(adjective=long_string))

# You can add an example to an example selector as well.  
new_example = {"input": "big", "output": "small"}  
dynamic_prompt.example_selector.add_example(new_example)  
print(dynamic_prompt.format(adjective="enthusiastic"))

'GPT' 카테고리의 다른 글

AI EXPO KOREA SUMMIT 참석 후 기억에 남는 이야기 정리  (0) 2024.05.07
ChatOpenAI  (0) 2024.04.30
🦜 랭체인(LangChain)  (0) 2024.04.29
GPT 프로젝트를 위한 Python 환경설정  (0) 2024.04.29

ChatOpenAI 객체 생성 옵션

  • 랭체인(langchain)의 OpenAI GPT 모델(ChatOpenAI)temperature
    • 사용할 샘플링 온도는 0과 2 사이에서 선택합니다. 0.8과 같은 높은 값은 출력을 더 무작위하게 만들고, 0.2와 같은 낮은 값은 출력을 더 집중되고 결정론적으로 만듭니다.

max_tokens

  • 채팅에서 생성할 토큰의 최대 개수

model_name

  • 적용 가능한 모델 리스트
    import openai
    

model_list = sorted([m['id'] for m in openai.Model.list()['data']])
for m in model_list:
print(m)

```python
from langchain_core.messages import HumanMessage, SystemMessage
from langchain_core.prompts import ChatPromptTemplate
from langchain_openai import ChatOpenAI

llm = ChatOpenAI(model="gpt-3.5-turbo-0125", temperature=0)

messages = [  
("system", "You are a helpful assistant that translates English to French."), 
("human", "Translate this sentence from English to French. I love programming."),  
]  

llm.invoke(messages)

ChatPromptTemplate

from langchain.prompts import ChatPromptTemplate

template = ChatPromptTemplate.from_messages([
    ("system", "You are a helpful AI bot. Your name is {name}."),
    ("human", "Hello, how are you doing?"),
    ("ai", "I'm doing well, thanks!"),
    ("human", "{user_input}"),
])

prompt_value = template.invoke(
    {
        "name": "Bob",
        "user_input": "What is your name?"
    }
)

Chaining


- Runnables를 '|'을사용해서 Chaining 할 수 있다

prompt = ChatPromptTemplate.from_messages(
    [
        (
            "system",
            "You are a helpful assistant that translates {input_language} to {output_language}.",
        ),
        ("human", "{input}"),
    ]
)

chain = prompt | llm
chain.invoke(
    {
        "input_language": "English",
        "output_language": "German",
        "input": "I love programming.",
    }
)

참고


'GPT' 카테고리의 다른 글

AI EXPO KOREA SUMMIT 참석 후 기억에 남는 이야기 정리  (0) 2024.05.07
🦜️🔗 Model I/O  (0) 2024.05.01
🦜 랭체인(LangChain)  (0) 2024.04.29
GPT 프로젝트를 위한 Python 환경설정  (0) 2024.04.29

1. 랭체인(LangChain)이란?

  • LLM과 애플리케이션 통합을 간소화하도록 설계된 SDK

기고 | LLM과 함께 뜨는 중··· 개발자를 위한 '랭체인' 안내서

데이터 소스

  • LLM에 대한 컨텍스트 구축을 위한 소스
  • PDF, 웹 페이지, CSV, DBMS와 같은 서로 다은 소스에서 데이터에 액세스하고 검색할 수 있는 모듈과 통합 지원

단어 임베딩

  • 일부 외부 소스에서 검색된 데이터는 벡터로 전환되어야함
  • 랭체인은 선택한 LLM을 기반으로 최적의 임베딩 모델 선택

벡터 데이터 베이스

대규모 언어 모델(LLM)

  • 랭체인은 오픈AI, 코히어(Cohere), AI21에서 제공하는 주류 LLM과 허깅페이스(Hugging Face)에서 제공되는 오픈소스 LLM을 지원

2. 랭체인 모듈

  • 이미지는 랭체인 프레임워크의 핵심을 나타낸다. 스택 상단의 애플리케이션은 파이썬 또는 자바스크립트 SDK를 통해 여러 랭체인 모듈 중 하나와 상호 작용한다.

3. 테스트 코드

  • 주피터 노트북 환경에서 테스트
  • .env 파일에 OPENAI_API_KEY="" 입력
from langchain.chat_models import ChatOpenAI

chat = ChatOpenAI()

chat.invoke("랭체인은 무엇인가요?")

AIMessage(content='랭체인은 블록체인 기술을 기반으로 한 게임 랭킹 시스템을 말합니다. 이를 통해 게임 플레이어들은 공정하고 투명한 방식으로 게임에서의 업적을 인증하고 랭킹을 확인할 수 있습니다. 또한 랭체인은 게임 개발사들에게도 플레이어들의 성과를 신뢰성 있게 기록하고 관리할 수 있는 기회를 제공합니다. 이러한 방식으로 랭체인은 게임 산업에 혁신을 가져다 줄 수 있는 기술적인 도구로 주목받고 있습니다.')


참고문헌

  1. LangCahin Quickstart
  2. LLM과 함께 뜨는 중··· 개발자를 위한 '랭체인' 안내서, CIO Korea
  3. 랭체인(LangChain) 입문부터 응용까지

'GPT' 카테고리의 다른 글

AI EXPO KOREA SUMMIT 참석 후 기억에 남는 이야기 정리  (0) 2024.05.07
🦜️🔗 Model I/O  (0) 2024.05.01
ChatOpenAI  (0) 2024.04.30
GPT 프로젝트를 위한 Python 환경설정  (0) 2024.04.29

1. 작업 환경

  • 원하는 위치에 작업폴더 생성

2. Virtual Environment

  • 프로젝트 마다 격리된 환경에서 작업 가능하도록 가상 환경 구축 가능 (파이썬 버전이 다른 프로젝트들 개별 관리)
  • 다양한 파이썬 가상환경 구성 방법이 존재

3. venv

  • python 3.3 이후 버전에서 venv 명령어 동작
  • python -m venv ./env
  • 가상환경 진입 (mac)
  • source env/bin/activat
  • 가상환경 진입 (window)4.requirements.txt 생성
  • .\env\Scripts\activate
  • 실습을 위한 패키지 목록 파일 생성
requirements.txt...
aiofiles==23.2.1
aiohttp==3.8.5
aiosignal==1.3.1
altair==5.1.1
annotated-types==0.5.0
antlr4-python3-runtime==4.9.3
anyio==3.7.1
appnope==0.1.3
asttokens==2.4.0
async-timeout==4.0.3
attrs==23.1.0
backcall==0.2.0
backoff==2.2.1
bcrypt==4.0.1
beautifulsoup4==4.12.2
black==23.9.1
blinker==1.6.2
blis==0.7.10
Brotli==1.1.0
cachetools==5.3.1
catalogue==2.0.9
certifi==2023.7.22
cffi==1.15.1
chardet==5.2.0
charset-normalizer==3.2.0
chroma-hnswlib==0.7.3
chromadb==0.4.11
click==8.1.7
coloredlogs==15.0.1
comm==0.1.4
confection==0.1.3
contourpy==1.1.1
cryptography==41.0.4
cycler==0.11.0
cymem==2.0.8
dataclasses-json==0.5.14
debugpy==1.8.0
decorator==5.1.1
dill==0.3.7
dnspython==2.4.2
duckduckgo-search==3.8.5
EbookLib==0.18
effdet==0.4.1
elastic-transport==8.4.0
elasticsearch==8.9.0
email-validator==2.0.0.post2
emoji==2.8.0
et-xmlfile==1.1.0
executing==1.2.0
faiss-cpu==1.7.4
fastapi==0.99.1
ffmpeg==1.4
ffmpeg-python==0.2.0
filelock==3.12.4
filetype==1.2.0
flatbuffers==23.5.26
fonttools==4.42.1
frozenlist==1.4.0
fsspec==2023.9.1
future==0.18.3
gitdb==4.0.10
GitPython==3.1.35
gpt4all==2.0.2
greenlet==3.0.0
h11==0.14.0
h2==4.1.0
hpack==4.0.0
html2text==2020.1.16
httpcore==0.18.0
httptools==0.6.0
httpx==0.25.0
huggingface-hub==0.16.4
humanfriendly==10.0
hyperframe==6.0.1
idna==3.4
importlib-metadata==6.8.0
importlib-resources==6.0.1
iopath==0.1.10
ipykernel==6.25.2
ipython==8.15.0
itsdangerous==2.1.2
jedi==0.19.0
Jinja2==3.1.2
joblib==1.3.2
jsonpatch==1.33
jsonpointer==2.4
jsonschema==4.19.0
jsonschema-specifications==2023.7.1
jupyter_client==8.3.1
jupyter_core==5.3.1
kiwisolver==1.4.5
langchain==0.0.332
langcodes==3.3.0
langsmith==0.0.52
layoutparser==0.3.4
loguru==0.7.2
lxml==4.9.3
manifest-ml==0.0.1
Markdown==3.4.4
markdown-it-py==3.0.0
MarkupSafe==2.1.3
marshmallow==3.20.1
matplotlib==3.8.0
matplotlib-inline==0.1.6
mdurl==0.1.2
monotonic==1.6
mpmath==1.3.0
msg-parser==1.2.0
multidict==6.0.4
murmurhash==1.0.10
mypy-extensions==1.0.0
nest-asyncio==1.5.8
networkx==3.1
nltk==3.8.1
numexpr==2.8.5
numpy==1.25.2
olefile==0.46
omegaconf==2.3.0
onnx==1.14.1
onnxruntime==1.16.0
openai==0.28.0
opencv-python==4.8.0.76
openpyxl==3.1.2
orjson==3.9.9
overrides==7.4.0
packaging==23.1
pandas==2.1.0
parso==0.8.3
pathspec==0.11.2
pathy==0.10.2
pdf2image==1.16.3
pdfminer.six==20221105
pdfplumber==0.10.2
pexpect==4.8.0
pickleshare==0.7.5
Pillow==9.5.0
pinecone-client==2.2.4
platformdirs==3.10.0
playwright==1.39.0
portalocker==2.8.2
posthog==3.0.2
preshed==3.0.9
prompt-toolkit==3.0.39
protobuf==4.24.3
psutil==5.9.5
ptyprocess==0.7.0
pulsar-client==3.3.0
pure-eval==0.2.2
pyarrow==13.0.0
pycocotools==2.0.7
pycparser==2.21
pydantic==1.10.12
pydantic_core==2.6.3
pydeck==0.8.0
pydub==0.25.1
pyee==11.0.1
Pygments==2.16.1
Pympler==1.0.1
pypandoc==1.11
pyparsing==3.1.1
pypdf==3.16.2
pypdfium2==4.20.0
PyPika==0.48.9
pytesseract==0.3.10
python-dateutil==2.8.2
python-docx==0.8.11
python-dotenv==1.0.0
python-iso639==2023.6.15
python-magic==0.4.27
python-multipart==0.0.6
python-pptx==0.6.21
pytube==11.0.2
pytz==2023.3.post1
pytz-deprecation-shim==0.1.0.post0
PyYAML==6.0.1
pyzmq==25.1.1
rapidfuzz==3.3.1
redis==5.0.0
referencing==0.30.2
regex==2023.8.8
requests==2.31.0
rich==13.5.2
rpds-py==0.10.2
safetensors==0.3.3
scikit-learn==1.3.1
scipy==1.11.3
sentence-transformers==2.2.2
sentencepiece==0.1.99
six==1.16.0
smart-open==6.4.0
smmap==5.0.0
sniffio==1.3.0
socksio==1.0.0
soupsieve==2.5
spacy==3.6.1
spacy-legacy==3.0.12
spacy-loggers==1.0.5
SQLAlchemy==2.0.22
sqlitedict==2.1.0
srsly==2.4.7
stack-data==0.6.2
starlette==0.27.0
streamlit==1.27.2
sympy==1.12
tabulate==0.9.0
tenacity==8.2.3
thinc==8.1.12
threadpoolctl==3.2.0
tiktoken==0.5.1
timm==0.9.7
tokenizers==0.14.0
toml==0.10.2
toolz==0.12.0
torch==2.0.1
torchvision==0.15.2
tornado==6.3.3
tqdm==4.66.1
traitlets==5.10.0
transformers==4.34.0
typer==0.9.0
typing-inspect==0.9.0
typing_extensions==4.7.1
tzdata==2023.3
tzlocal==4.3.1
ujson==5.8.0
unstructured==0.10.16
unstructured-inference==0.6.6
unstructured.pytesseract==0.3.12
urllib3==1.26.16
uvicorn==0.23.2
validators==0.22.0
wasabi==1.1.2
watchdog==3.0.0
watchfiles==0.20.0
wcwidth==0.2.6
websockets==11.0.3
wikipedia==1.4.0
xlrd==2.0.1
XlsxWriter==3.1.5
yarl==1.9.2
zipp==3.16.2

5. 가상 환경 안에서 추가 패키지 설치

pip install -r requirements.txt

6. 설치된 패키지 테스트

  • main.py 파일 생성
  • tiktoken 모듈 출력해보기
  • 실행 python3 main.py

7. 가상환경 나가기

deactivate

8. env 파일 생성

  • 가상환경 변수, 키값 변경
  • git 사용시 gitignore에 추가
  • open API key 복사

9. Jupyter notebook

  • 새 파일 생성 notebook.ipynb
  • 커널 선택으로 이전에 만든 env 환경 선택
  • 주피터 노트북은 기본값으로 .env 파일의 내용을 환경변수로 불러옴

'GPT' 카테고리의 다른 글

AI EXPO KOREA SUMMIT 참석 후 기억에 남는 이야기 정리  (0) 2024.05.07
🦜️🔗 Model I/O  (0) 2024.05.01
ChatOpenAI  (0) 2024.04.30
🦜 랭체인(LangChain)  (0) 2024.04.29
  • eXERD v2를 사용하다가 v3로 변경하여 사용하려고함
  • v3.3.40 exe 설치 버전에는 GIT 기능만 포함되어 있고 SVN 플러그인 기능은 추가 설치 필요

eXERD 단독 실행 버전(exe 설치 버전)에서 SVN Plug-in을 설치하는 방법

  • SVN은 eXERD에서 제공하는 공식적인 플러그인이 아닙니다. SVN 플러그인이 업데이트 됨에 따라 배포되는 UpdateSite URL이 변경될 수 있습니다.
  • 아래 방법으로 업데이트가 되지 않을경우 아래 링크에 있는 UpdateSite URL을 확인하여 주시기 바랍니다.
  • 위 주소에서 제공하는 URL로 다운로드가 진행되지 않을경우 Eclipse플러그인 방식으로 eXERD를 설치하신 뒤, Market Place에서 SVN플러그인을 다운로드 하여 이용해주시기 바랍니다.
    • 또한 UpdateSite URL은 플러그인을 배포하는 주소로, 브라우저로 접속시 404오류가 표시되며 접속이 안됩니다.

(1) eXERD 도움말 → Install New Software ... 를 선택합니다.

(2) Available Software 탭 → Add Site... 를 선택합니다.

(3) https://subclipse.github.io/updates/subclipse/1.12.x/ 를 입력합니다.

(4) 아래 그림의 체크된 항목을 선택하고, 설치를 진행합니다. (설치후 재시작)

SubClipse > SubClipse(Required)
SubClipse > SubClipse Client Adapter(Required)
SVNKit > SVNKit Client Adapter(Not required)

  1. SVN 서버 연결방법

(1) eXERD를 재 시작하고, 창 → Perspective 열기(O) → 기타(O)... 를 선택합니다.

(2) Perspective 열기 다이얼로그에서 SVN Repository Exploring를 선택합니다.

(3) SVN Repositories Perspective에서 New →Repository Location...을 선택합니다.

(4) 연결하고자 하는 SVN 서버 URL을 입력합니다.


v3.3.40 exe 설치 버전에서 동작 확인 (2024-03-27)

참고문헌

'개발환경' 카테고리의 다른 글

Git Tag  (0) 2024.06.08
Git branch  (0) 2024.06.08
서버단에 프로그램 올리기  (0) 2022.11.17

+ Recent posts